Saving and Exporting
The fastest way to save a project is to use the Ctrl+S keyboard shortcut, but you can also save by going to the File menu and choosing Save or Save As. When saving a new project for the first time you'll be asked to name your project and choose where on your hard drive it will be saved.
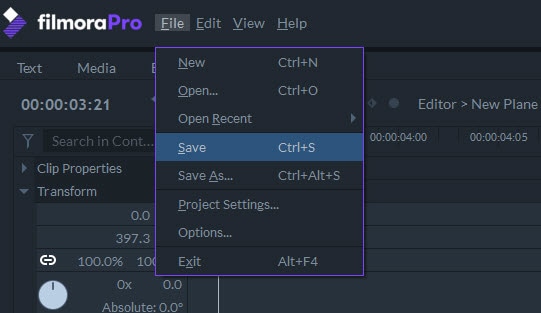
Choosing Save As lets you choose a new name or destination for your saved project. If this isn't your first time saving the project, this will create a second project file.
Filmora's Pro video editor also auto-saves your project at predefined intervals to ensure that you can recover your work if for some reason the program shuts down before you have a chance to save your project.
More information about adjusting the auto-save settings is available on the Setting Up FilmoraPro page.
The media assets you're using in a project are not saved in the project file. In order for FilmoraPro to access them the next time you work on your project you must make sure that they are still saved in the same location and that the file names have not changed. If you're opening your project on a different computer then you started it on then you will need to transfer your media assets to the second computer as well.
Exporting
Begin exporting by clicking Export in the top right corner of the timeline. A file browser will appear for you to name the rendered clip and choose where to save it.

The Export button automatically exports the In-to-Out Area of your project using the default export preset.
For other export options, click the triangle icon next to Export, as shown below.
Export Now: Choose whether to export your entire timeline (‘Contents’) or just the range between the in and out points.
Add to Queue: Add a task to your export queue without beginning the export yet.
Default Preset: Verify the default preset selected or choose to use a different preset.
Contents: exports all of the media on your timeline as a video.
In-Out Area: exports only the portion of your project that is between In and Out points which you have set.
The Export Panel
FilmoraPro's Export Screen is divided into two main sections:
The Presets Tab
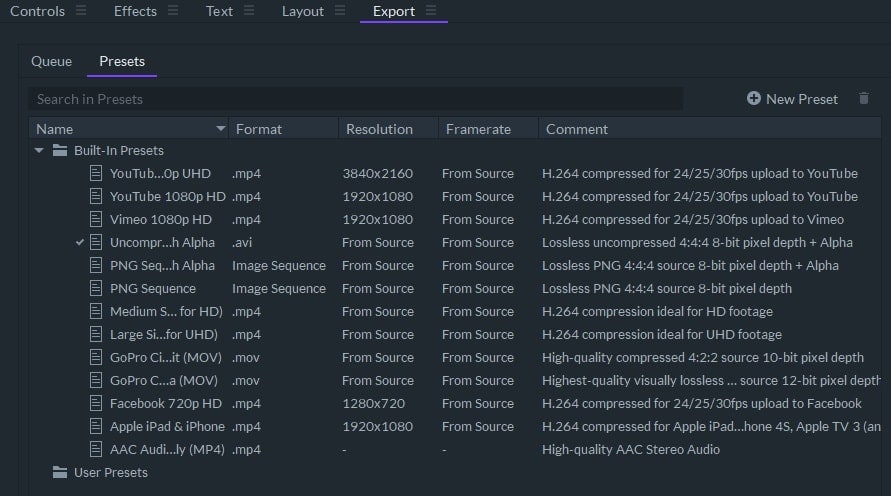
All available export presets can be found in the Presets panel of the Export Screen. Export Presets are divided into two categories:
- User Presets – Choose a combination of resolution, compression settings, and video format that you want to export with and save it as a Preset to use for future exports. To create a new Preset, right click on User Presets and choose one of the options under Create Preset to open the Edit Export Preset window. There is no limit to how many presets you can create.
- Built-in Presets – All presets the software offers by default are located in this folder. They provide a diverse range of export options that are suitable for all common types of videos. To customize a Built-in Preset, right click on it and choose one of the options under Create Preset.
Visit the Supported Formats page of this manual to learn more about the export format options.
Double-clicking on a preset will enable you to select it and change the preset that is applied to new export tasks by default.
To delete a User Preset, select the preset you want to delete and click on the Delete Preset icon located below the preset list. You cannot delete Built-in Presets.
The Queue Tab
Projects and sections of projects that are waiting to be exported will be displayed in this panel.
- Default Preset – Choose from a selection of export settings optimized for platforms like YouTube or Vimeo, or other standard settings like GoPro CineForm.
- Name – The name of the task.
- Format – The video file format your project will export to.
- Preset – The export settings (video file format, compression settings, aspect ratio, frame rate, etc.) FilmoraPro will use for the task. You can choose a different Preset by clicking on the one listed and choosing from the dropdown menu.. You could also drag a preset from the Preset Panel and drop it onto your task in the Queue.
- Duration – The duration of the file you're exporting.
- Output - The destination on your computer or external hard drive where your exported video will be saved. You can click on the file path to change the destination and name the file you're exporting.
- Progress – A progress bar that keeps track of the rendering process. After you click Start Exporting you will be able to see how much of the task is completed and how much of it remains.
- Start Time – The time of the day the export started.
- Elapsed - The amount of time that has passed since the export started. Remaining – An estimation of the time remaining until the export is completed.

Right click on each task in the Queue tab you'll see the following options:
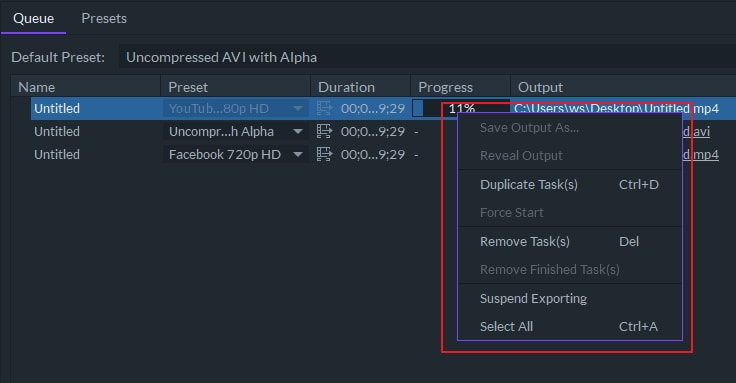
- Save Output As –Choose a name and file path for the video when it is exported.
- Reveal Output –Open the file location of a task that has already been exported.
- Duplicate Task(s) –Add a second instance of this task to your queue.
- Force Start –Begin exporting the tasks in your queue, starting with the one you clicked on.
- Select All –Select all of your tasks so you can duplicate or remove them all.
- Remove Tasks –Click this to remove one or more selected tasks from the queue. These tasks will not be exported.
- Remove Finished Task(s) – After one or more export tasks are complete you can click this to remove them from the Queue panel.
- Start Exporting – Click this to begin exporting the tasks in the Queue. Tasks will be processed from the top down, which means that the first task in the list will be rendered before the second, and so on. Once the exporting has started, this button will change to Suspend Exporting and you will be able to use it to pause the export process.
Preview Video
Your export progress will be shown in the Export Panel. As the software advances through the task the frames that are currently being rendered will be displayed here. You can also see the details of the video that is being processed, including the task name, the preset, and the compression. The images displayed in the Preview Panel are taken from the buffer of the export. They do not slow down the export process because no additional rendering is required to display them.

Exporting Individual Clips
To export an individual clip, right-click on it in the timeline and choose Add to Export from the menu that appears.
You can repeat this process for multiple clips and they will all be added to the Export Queue as separate tasks.
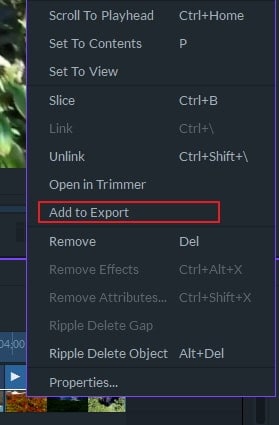
The Add to Export feature is useful if you want to batch convert video files to a new format. If you add video clips to the Export Queue this way the names of tasks in the queue will indicate their source and their positions on the timeline.